Always expand the Assessments Options Tree before logging a new Assessment. The  button is in the Assessments toolbar at the top of the screen.
1. Click the  button in the Assessment toolbar.
The New assessment details box displays. When you belong to one team, the Owning team field is populated with your team name.
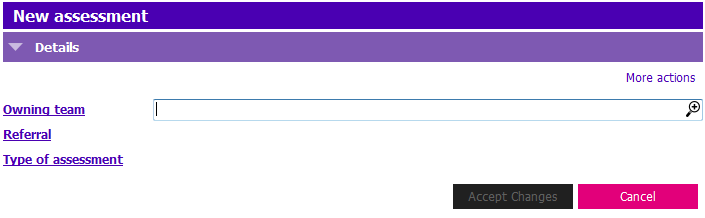
2. When you belong to more than one Team, press F4 or click the lookup icon  in the Owning team field.
The Owner Key Lookup displays.
3. Select the appropriate Team from the list. (Double click the team row or select the team row and click Accept Changes.)
The Owner Key Lookup closes and the Owning team field is populated with the selected Team name.
4. Press F4 or click the lookup icon in the Referral field.
The Referral Lookup displays.
5. Select the appropriate Referral from the list. (Double click the team row or select the team row and click Accept Changes.)
- (Optional step) Use the Type & Find to further narrow your search results. The search results decrease based on the characters typed.
The Referral Lookup closes and the Referral field is populated with the selected Referral.
6. Press F4 or click the lookup icon in the Type of Assessment field.
The (Assessment type) SEARCH displays:
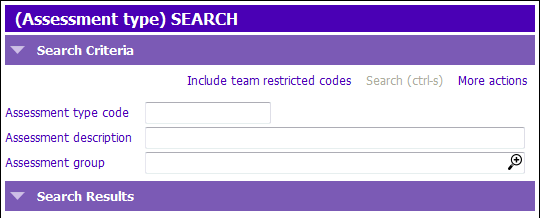
7. To search for the assessment type enter the following fields:
- Assessment type code: Type the assessment code, or an asterisk *. If you do not know the code, then click on the Search button or press Ctrl + S, or
- Assessment description: Type the name of the assessment, or the partial name with an asterisk *, then click on the Search button or press Ctrl + S Type and Find field to navigate to the appropriate Type in the list.
- Assessment group: Type the two letter program abbreviation (e.g. ac, mh, ic...) or select group from the picklist and search
8. Click to select the appropriate 'Assessment Type' and press Enter, or double click.
IMPORTANT: Once selected, Assessment type becomes read only, if the wrong Assessment was selected click Cancel and start again.
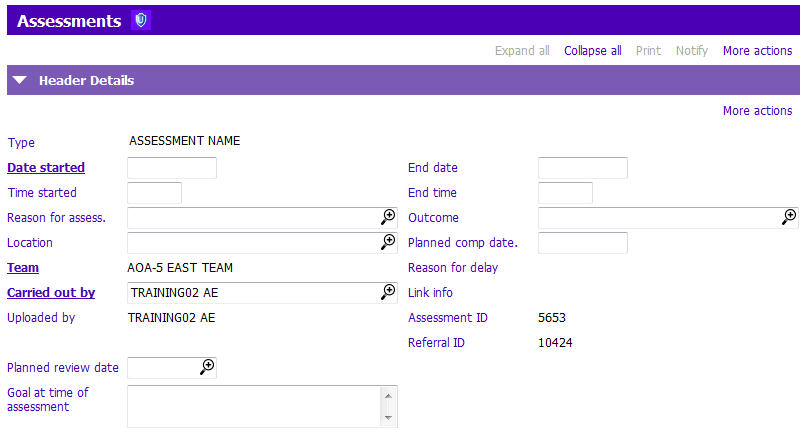
9. The assessment will open on the screen and you must enter the following fields in the Header Details section:
- Date started: Enter today’s date (the date the client was assessed) Ctrl + T = today's date (the date the client was assessed). PARIS date format: dd/mm/yyyy
- Reason for assess.: Check your guidelines to determine if this field is used by your service
- Team: This field defaults to your Team name
-
Carried out by: Defaults to name of person logged on. If this isn’t the person who performed the Assessment, select correct person from Carried Out By picklist
- The Carried out by field is generally auto-populated - in some MH Assessments it is entered from an AUTH tab
- Recorded by: Defaults to name of person logged on & is read only
IMPORTANT: Save once you've completed the Header Details
10. Proceed with filling out the assessment. If you are uncertain about how to fill out the assessment, refer to the clinical guidelines for each assessment.
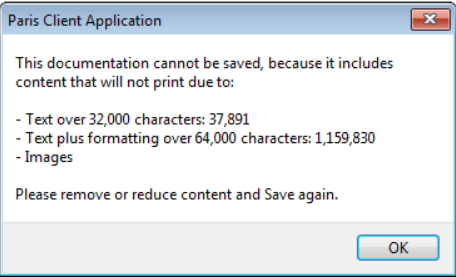
11. Save periodically as you add content. If you receive the below message when trying to save, see Check for Images and Excessive Text
Close your Assessment
12. To close your assessment, you must enter an End date in the Header Details section:
- End date: Enter the appropriate date
13. Press F12 to Save.
NOTE: Assessments must be End Dated before the Referral can be discharged. Once the Assessment is End Dated everything will become read only.