Enter Medications
Enter Medication Administration and Dispensing Record (MAD-R)


You can enter up to six medications at once using Batch Entry
Enter Medications

1. Enter the following fields:
- Team: Double click in the field to select your Team
- GP/NP Details: Auto-fills from Central Index
- Process: Tick when you’ve finished entering all of the medications.
- Cancel: Tick to cancel entries that have not been processed
- Med: Select the appropriate medication from the picklist
- Dose: Enter the amount of drug taken per dose
- Route: Select the appropriate route
- Freq: Select how often the client takes the drug
- PRN or Med Admin Dispense Record (MAD-R): Tick the appropriate boxes
- If you administer the medications to the client, it’s important to tick the MAD-R tick box
- Instr: Free text field for special instructions
- Start: Use PARIS date format to enter the date the med was started
- End: Use PARIS date format to enter the end date if applicable
- Auth Prescriber: If it’s the GP/NP tick the GP? box. The Prescriber and ID fields will auto-fill
NOTE: To modify several medications at a time, go to the Medication Worksheet application
2. Click the Process tickbox once you've entered all of the medications. The meds will move from the entry form into the Medications - Current grid
3. Press F12 to Save
Enter Medication Administration and Dispensing Record (MAD-R)
N.B.*** Before you complete the MAD-R, you must complete the Medication Profile. See Medication Profile on how to complete
1. Ensure for all Medications you will be either administering or dispensing, you have ticked the MAD-R tick box. This can be done when doing a Batch Entry of Medications or when entering or modifying individual meds. NOTE: This does NOT include medications being given by a HSW; those are documented in a PAG letter.

2. Go to the Casenotes Application and choose Progress Note - MAD-R
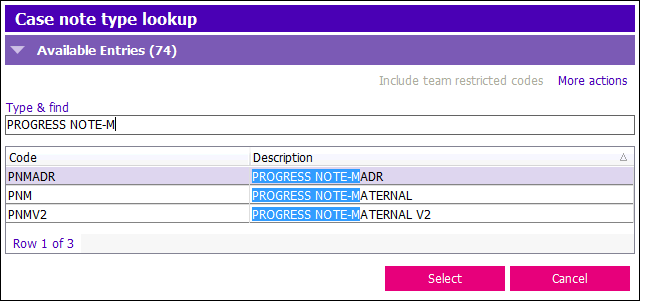
N.B.***These steps can also be used for the Progress Note – Palliative and Progress Note – Palliative On-Call** as they also have the MAD-R Worksheet and Grid.
3. Complete the relevant sections of the Case Note (Contact info, Case Note Reason, etc.) For steps to do this, see How to Log a Progress Note
4. You will see a ‘Worksheet’ section and a ‘Medication Admin/Dispense Record’ section. Open the ‘Worksheet’ section. Enter the date and time you have administered or prepared the medications. ***N.B. Use the 24 hours clock for clarity!!!
5. Tick on the Pull tick box. NOTE: The initial choice is for all medications that are ticked ‘MAD-R’ to be pulled (PRN meds are grouped at the bottom of the worksheet); if you want to pull only non-PRN meds or only PRN meds, tick the appropriate box and only those meds will be pulled.
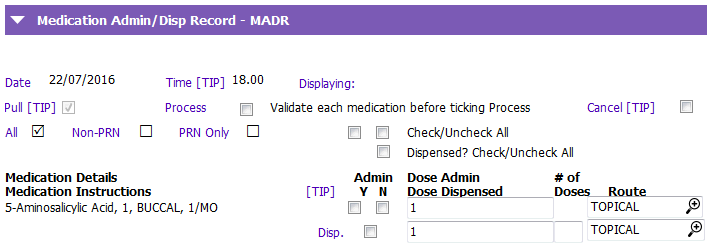
6. You will see all the medications the client is expected to have either administered and/or dispensed. The left part of the screen shows the order as documented in the Medication Profile, and is read-only.
***N.B.: The medication dose and route are listed; dose and route are defaulted from the Profile. If needed, you can change the dose. If there is more than one route in the order (e.g., PO or PR), the dose remains blank and you must complete the route for the medication prior to processing/saving.
7. The top row lists whether medications are administered or not administered (you planned to administer them, but did not). Tick ‘Y’ or ‘N’ as appropriate.
8. The bottom row shows ‘Dispense?’ (Disp.). Tick if you have dispensed meds for the client/caregiver to administer at a later time. Enter the # of doses you have dispensed.
9. NOTE: To save steps, if you have administered or not administered all the meds on the list, you can tick Check/Uncheck All. If you tick Dispensed, You MUST enter the # of doses you dispensed. If you did not dispense any medication, you can uncheck the appropriate tick boxes.
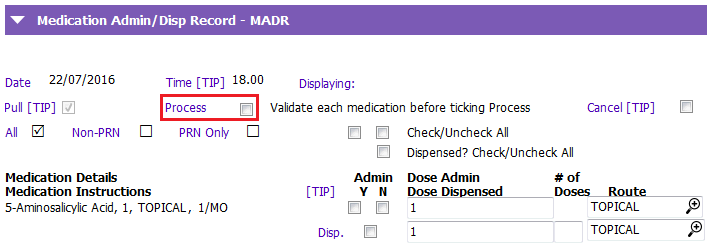
10. When you have completed all your entries, tick Process. ONCE YOU HAVE DONE THIS, THE MEDICATIONS AUTOMATICALLY ENTER INTO THE Medication Admin/Prep Record. THEY THEN BECOME ‘READ ONLY’. Click Save. If you have made errors and need to re-do the record, click Cancel. If you need to record more than one dose administered (e.g., one medication given at 1:00 and one at 1:30), you would enter the date, the new time, and ‘pull’ again. You can then enter the relevant information
11. You can enter any comments and clinical information into the Progress Notes Narrative section.
REPORTS:
Reports can be found in Care Reports or in the Medication Module. Reports can be pulled to find information on the client’s medication profile (list), client medication history, history of medications administered/dispensed or related progress notes.
12. If you are not taking your tablet to the site of care and require a paper record for reference, you can generate a Client Medication MAD-R Worksheet. It is found in both Care Reports and the Medication Module Medication Reports Section.
13. You can generate reports in both Care Reports and in the Medication Module. To view all the MAD-R Case Notes, choose the Progress Note – MAD-R Report. To view only the medications that were administered/dispensed, choose the Client Medication Admin/Dispense Record.
14. To Create the Medication Letter for the GP, you will need to go to the Assessments application. Click on any Assessment (open or closed) under your team, and click on the  button. Select the AOA-MEDICATION LETTER. See Generate, Print and Store a Letter for more information.

You can add new medications by clicking Insert a row or update/change medications by clicking Modify row in the grid.