Create New Casenote
Enter Your Notes
Related Links
Check your program guidelines to determine when and how often you need to create a new Casenote.
- Depending on Casenote Type and/or Team, additional details may be required when recording a Casenote
- You cannot modify or delete User Name/Date/Time stamp
NOTE: When creating or editing a lengthy or detailed Casenote, you should SAVE frequently!
Create New Casenote
1. From the Referrals or Assessments application, click the  button in the application toolbar. From the Casenotes application click the
  button. The New casenote details box displays.
2a. When you belong to one team, the Owning team field is populated with your team name.

2b. If you are a member of more than one team, press F4 or click the lookup icon  in the Owning team field. The Owner Key Lookup displays.
Select the Team which provided the service (Double click the team row or select the team row and click Accept Changes). The Owner Key Lookup closes and the Owning team field is populated with the selected Team name.
3. Press F4 or click the lookup icon in the Type of case note field. The Casenote type Lookup displays.

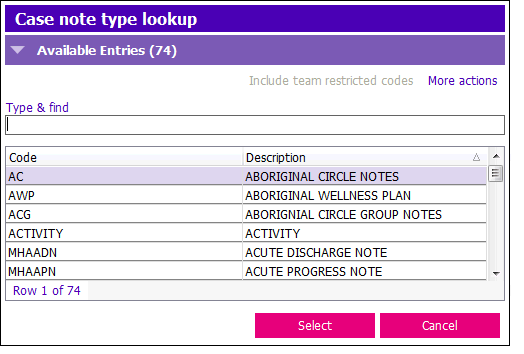
4. Select the appropriate Casenote Type (see your program guidelines). The Casenote type Lookup closes. The Casenote form then displays.
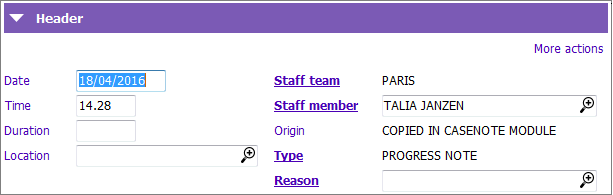
5. Enter the following fields in the Header section:
- Casenote Type: Becomes read only. If you select the wrong Type click Cancel and start again
- Date: Today’s date defaults in. If this is incorrect, enter correct date; PARIS date format is dd/mm/yyyy
- Time: Default is current time. Guidelines state default time should be left as is and corrected times entered into body of Case Note
- Duration and Location are not used
- Staff Team: Defaults to your team
- Staff Member: Defaults to the logged on user's name. When dicta-typing notes, select the appropriate staff from the picklist
- Origin: Defaults in to origin of casenote
- Type: Becomes read only. If you select the wrong Type click Cancel and start again
- Reason: Click the
 or press F4 to activate the Case note reason lookup. Select the appropriate reason from the picklist

6. Check your program guidelines regarding MRRs or details required, other than your notes
7. SAVE before you start to write your notes
Enter Your Notes
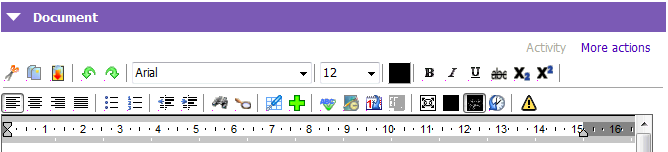
1. Click inside the Document box and type your notes. Check your program guidelines for documentation standards and formatting
- You can use the Formatting bar to format the notes See Casenote Formatting for more information about the buttons in the Formatting bar.
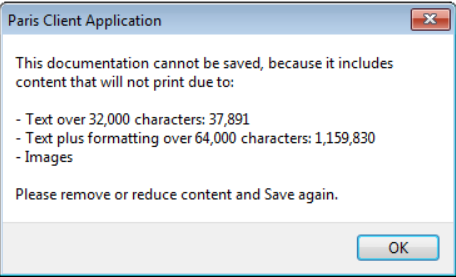
2. Save periodically as you add content. If you receive the below message when trying to save, see Check for Images and Excessive Text
Related Links
Check for Images and Excessive Text
Create a Progress Note (AOA/CC/HC)
Mark Field, Grid Row or Casenote as Crucial