A.E.F.I. Entry (Enter an Immunization Adverse Event)
Submit AEFI Form for Review by MHO/Designate
Review of AEFI by MHO/Designate
Community Follow-up
Form Status
Print AEFI Case Report Form
Modify an Immunization Adverse Event
View an Immunization Adverse Event
A.E.F.I Entry
Enter an Immunization Adverse Event
Prior to entering an Immunization Adverse Event, enter the client’s immunizations in Immunizations Entry (Adhoc).
If the reporting criteria is met, create the AEFI Case Report Form. If not, create a casenote (Type = Immunization).
1. Navigate to A.E.F.I. Entry
|
|
2. Click Add a form
a. Owner key lookup displays: Select Team
b. Associated forms lookup displays: Select AEFI Case Report Form
Main tab
Form Status
The fields Form Status, Recorded By, and Last Updated By are read-only and auto populated. The Form Status indicates the progress of the form (i.e. Initiated, Under Review by MHO/Designate, Community Follow-up Required, Completed, or Entered in Error). If the form was created in error (e.g. wrong client), staff can click Entered in Error.

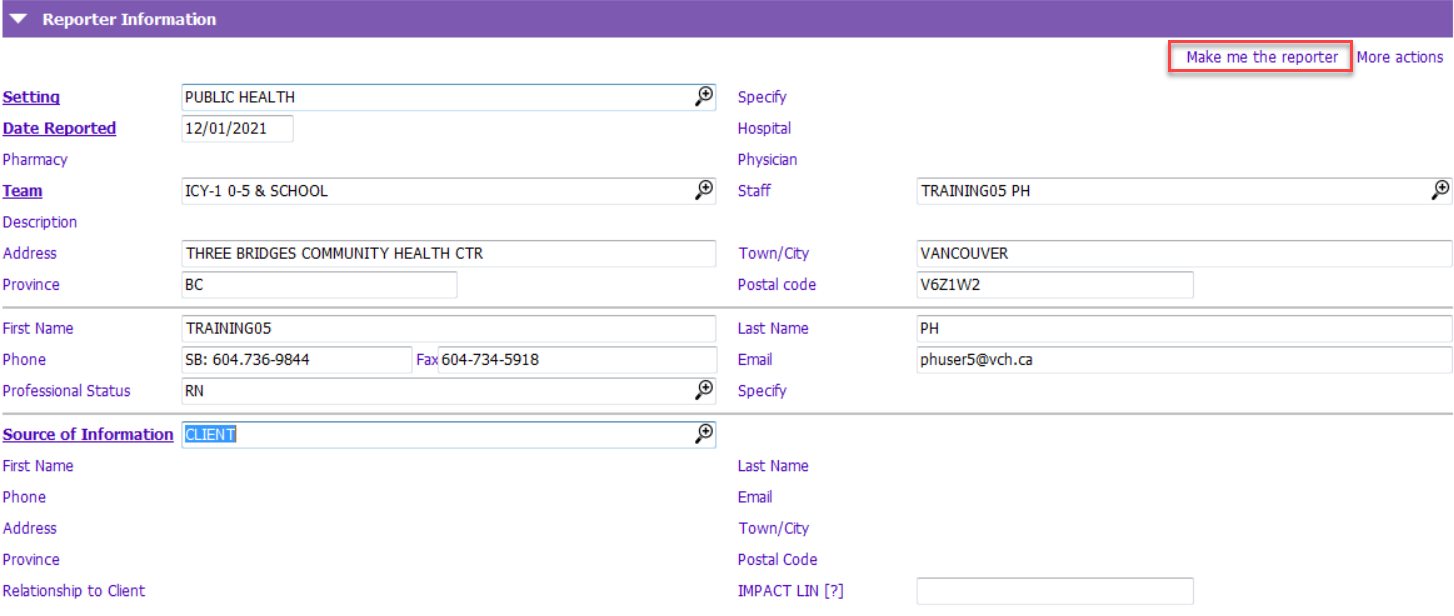
Reporter Information
This section is used to document the health care provider who received and reported the AEFI information to the public health unit.
- Make me the reporter button: click Make me the reporter to auto populate the Setting as Public Health, the associated team and the logged in user’s info
- Setting: the selected setting determines which fields are enabled and auto populated. For example, if Setting = Hospital, Hospital field becomes enabled.
- Description: If the GP, Hospital, or Pharmacy cannot be found in the lookup, enter the name in the Description field.
|
|
Physician (Or Primary Care Provider)
This section displays the client’s current GP if entered. Staff can click on the Go to Central Index button to add or update the Physician or Primary Care Provider.
1. Save the form to enable the Go to Central Index button
2. Click Go to Central Index button
3. After adding and saving the GP in Central Index, click the Close button twice to return to the AEFI Entry form.
Imm Data – Impact of AEFI tabs
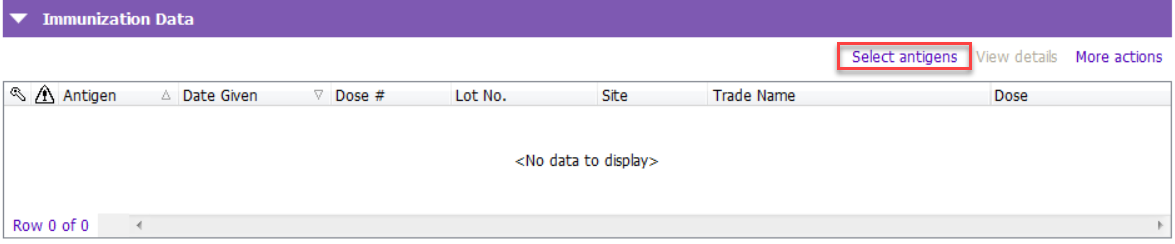
Immunization Data
Staff can select the antigen(s) that are associated with the immunization adverse event.
1. Click Select Antigens. Select Antigen dialog displays list of all the antigens the client has received (pulled from Immunization History grid).
2. Select antigen(s) associated with the adverse event. Selected antigens will display in the grid.
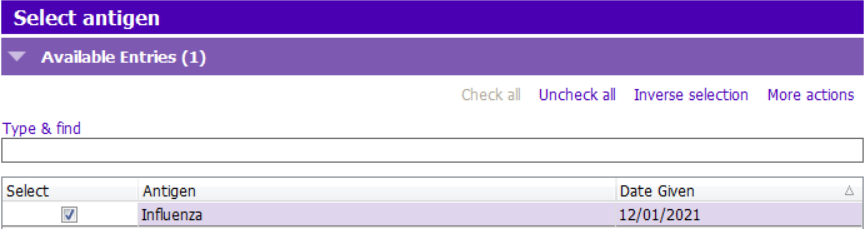
3. To select or de-select an antigen, click Select Antigens. Select or de-select the appropriate antigens.

Remaining Sections
The sections starting with Information at Time of Immunization and AEFI Onset through to Impact of AEFI on Activities of Daily Living (ADL), Outcome, and Level of Care Obtained correspond to the AEFI Case Report Form.
- Fields that are not applicable are grayed out and disabled.

- Upon initial save of the form, an Immunization and a General Alert will automatically be created if the alerts don’t already exist.
 TIP: If the AEFI Case Report Form was entered in error or the Adverse Event Alert is no longer applicable, the immunization alert must be manually end dated. TIP: If the AEFI Case Report Form was entered in error or the Adverse Event Alert is no longer applicable, the immunization alert must be manually end dated. |

Document Upload tab
Staff can upload documents (e.g. BCCDC Anaphylaxis Worksheet, IMPACT assessment, consult notes, workplace health documents) and pictures (e.g. rashes, swelling).
- File types: pdf, txt, jpg, and jpeg files can be uploaded from the user's Home Directory (H:):
- Maximum file size: 2 MB
- File names: the system does not allow duplicate file names. Please use the following naming convention: date, description of uploaded document, initials (E.g. 2021-01-12_AEFIphoto_AW).
- Please do not upload pictures with personal identifiers (e.g. face, body markings, etc.)
- Document Upload section will remain editable after the A.E.F.I. form is completed
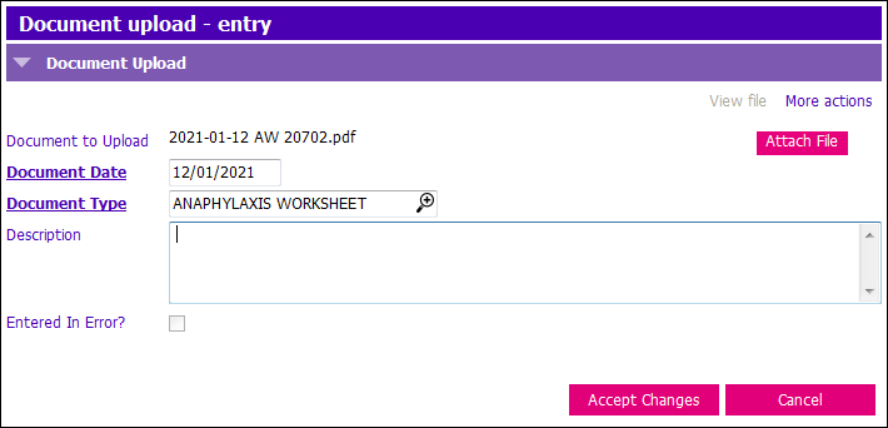
To Upload a Document:
1. Insert a Row
2. Click Attach File
3. Highlight the file in your H:. Click Open.
4. Document Date: enter
5. Document Type: select
6. Description: enter if required
7. Click Accept Changes
To View a Document:
1. Highlight the row in the grid
2. Click View file button. File will open.
OR
Click View Details or Modify row. Click View file button within the entry screen. File will open.

Submit AEFI Form for Review by MHO/Designate
Upon completion of all of the tabs except for MHO/Designate Recommendations, the Public Health Nurse (PHN) can submit the AEFI Form for review by the MHO or Designate.
1. Navigate to the Impact of AEFI tab
2. Tick Submitted for review by MHO/Designate
3. Upon Save, the form status changes to Under Review by MHO/Designate
4. Click Notify button. Enter the applicable fields to send the PARIS notification to the MHO and Designate.
| TIP: Notify and Email the MHO and Designate. |

Review of AEFI by MHO/Designate
The MHO/Designate Recommendations section will be completed by the MHO or Designate upon review of the AEFI Form.
1. Navigate to the MHO/Designate Recommendations tab and section
2. Complete Community follow-up Yes/No question prior to ticking Section complete
3. Select Name of MHO/Designate. This is the name that will display on the report in Section H.

4. Upon completion of the section, tick Section Complete. Click Save.
a. If Community Follow-up = Yes, the form will become read-only except for the Community Follow-up section and Document Upload. The form status changes to Community Follow-up Required.
b. If Community Follow-up = No, the name of the MHO/Designate and date will populate the Community Follow-up Section Complete fields. The entire form will become read-only except for the Document Upload section. The form status changes to Completed.
5. To print the AEFI Case Report Form, navigate to the Main tab, Form Tools section.
6. To notify the PHN to complete Community Follow-up, click the Notify button. Enter the applicable fields.
Community Follow-up
As per MHO/Designate Recommendations, the PHN will complete the Community Follow-up section.
1. Navigate to the MHO/Designate Recommendations tab
2. Navigate to the Community Follow-up section
3. Enter the Community Follow-up Following MHO/Designate Recommendations section
4. Tick Section Complete. Click Save. The form will become read-only except for the Document Upload section and the form status will change to Completed.
Form Status
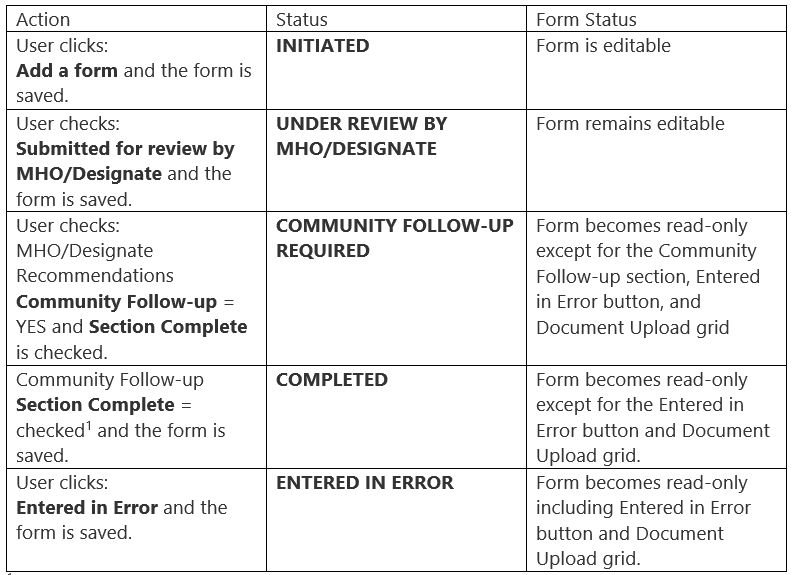
1 If user checks Community Follow-up = NO, when the MHO/Designate Recommendations Section Complete is checked, the Community Follow-up section is auto completed.
Print AEFI Case Report Form
The AEFI Case Report Form can be printed from the A.E.F.I. Entry, A.E.F.I. History, or Clinical Summary apps.
A.E.F.I. Entry
1. Highlight the AEFI Form in the tree to open
2. Navigate to Form Tools
3. Click Print Form
4. Click Run Report
A.E.F.I. History
1. Highlight the applicable row in the grid
2. Click Print Form
3. Click Run Report
Clinical Summary
1. Highlight the applicable row in the grid
2. Click Print Form
3. Click Run Report
Modify an Immunization Adverse Event
AEFI Forms that do not have a status of Completed can be modified.
1. Navigate to A.E.F.I. Entry app
2. Highlight and click the applicable AEFI Form in the tree to open
3. Modify the immunization adverse entry as required

View an Immunization Adverse Event
Immunization adverse events can be viewed within the A.E.F.I. Entry, A.E.F.I. History, or Clinical Summary apps.
A.E.F.I. Entry
The A.E.F.I. Entry app displays immunization adverse events created January 27, 2021 and Onwards
1. Navigate to A.E.F.I. Entry app
2. Highlight and click the applicable AEFI Form in the tree to open
A.E.F.I. History
The A.E.F.I. History app displays the Adverse Event Following Immunization (AEFI) History for a client. There are two grids:
1. Immunization Adverse Events (January 27, 2021 and Onwards)
a. Highlight the applicable row in the grid
b. Click Go to form button to open the selected AEFI form

2. Immunization Adverse Events (Prior to January 27, 2021)
a. Highlight the applicable row in the grid
b. Click View details

Refer to SHOP for the Standard Operating Procedure on uploading photographs in PARIS.
Workflow may include entering an Immunization Alert.